Hilarious video of our 2014 road trip to 22 states and 15 national parks...


Do-It-Yourself Wi-Fi Signal Booster
Wi-Fi reception in many places is limited at best. Many of us use add-on omnidirectional antennas that plug into our USB ports to allow us to pick up a better signal. The most popular of these antennas are the Alfa 802.11g and the Alfa 802.11g/n. Being able to focus the signal to the external antenna dramatically extends the range at which we can receive signals. Using items you probably already own, we'll show you how to build your own directional wi-fi signal booster. You'll need the following items:- A piece of copy paper or card stock
- A small piece of aluminum foil
- A pair of scissors and a razor blade or knife
- A glue stick or other suitable glue
- A roll of clear tape
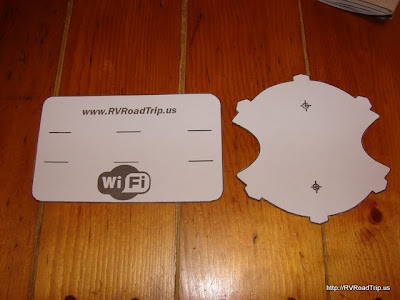
First, download and print this template. You can print it on copy paper or card stock. The goal is to get the image to fill the page as closely as possible. The actual steps to do this may vary from the instructions shown below.
- In Photoshop, hit CTRL-P, select "Scale to Fit Media" then click PRINT.
- If printing directly from IE8, select "Print Preview". Where it says "Shrink to Fit", select CUSTOM and type in 120, then click the print icon.
- If using Firefox, click FILE then PRINT PREVIEW. Change the scale to CUSTOM and type in 120 then hit OK. Now click PRINT.
After printing it, simply cut it out as carefully as possible. Once it has been cut out, it should look like this.
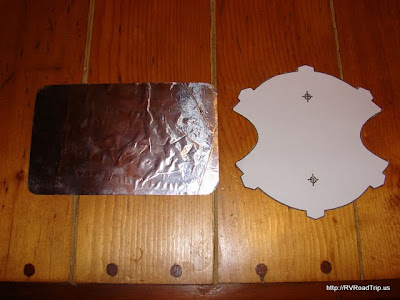
Now tear off a section of aluminum foil that is larger than the rectangle piece you just cut out. Glue the aluminum foil to the rectangle cutout on the side without any printing on it. Now trim the edges. Be sure to get the glue on the edges as well as the middle area. When you have finished applying the aluminum foil, it should look like this.
Now turn the rectangle piece over and cut on top of the 6 printed lines. You can use a razor blade or a sharp knife, just make sure to cut cleanly through the paper and the foil. Now cut out the 2 holes marked on the other cutout piece. Make these holes large enough for your antenna to fit through them. Next, gently bend this cutout piece and starting at the middle, insert the 6 tabs through the 6 slits you just cut. Fold the tabs over after they are inserted and tape them down using scotch tape. That's it, you're done. Here is what the finished product should look like.
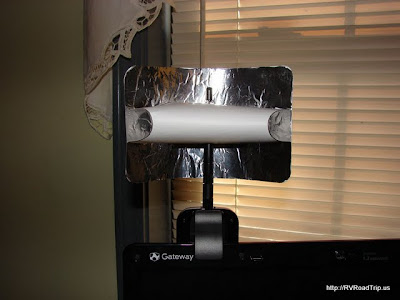
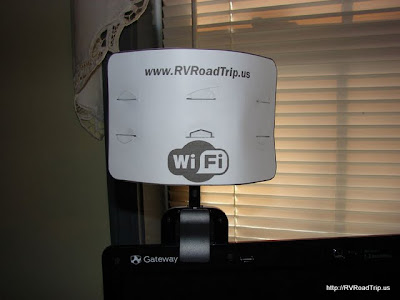
Slide your newly constructed dish over your booster antenna. If you know the direction your wi-fi signal is coming from, simply point the dish in that direction. If you are unsure of the direction, slowly rotate the dish and watch your signal meter. It will increase when you are pointed in the right direction. We have seen a 1 bar signal go to 4 bars using this dish but gains will vary.
Enjoy your wi-fi!