Hilarious video of our 2014 road trip to 22 states and 15 national parks...


RV Solar Panel Installation Guide - RV Solar Power
 Alrighty now. Being practical and all, we knew there might be times we would have to boondock to save a little money. A camper can carry it's own limited water supply and usually has 2 holding tanks for grey and black water... but without a generator, you can't generate your own power. But wait! There's solar!
Solar power was the answer. The sun shines on most days so we figured we might as well make good use of the free light that the good Lord provides us. Now we're no solar experts but we are pretty smart and we can read, so we set out to learn as much as we could before plunking down our hard earned cash. We'll try to share most of what we learned with you here and show you what we did. We're not saying our way is the only way, it was just the right way for us. Now some of you might disagree with some things we did but that's OK. Opinions are like... belly buttons. Everybody has one and they are worth their weight in lint. [ View Solar Panel Kits Here ]
First. we'll cover the components of our solar system. No, not THAT solar system, the one on our RV. Here it is in a nutshell:
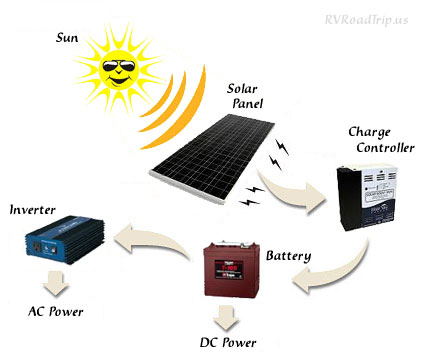
Now that sounds like a short list but trust me, it is not. Each one of those components requires even more components to make them do what they are supposed to do. We'll go into each part in detail and show you how we came up with what we have.
Solar Panels
It's not so easy to just say you need solar panels. First, you need to determine how many solar panels and what size you are going to need. To do this, you need to find out how many amps you are using on average each day. Rather than link to an energy use calculator and have the link go bad one day, just use this Google Search and pick one you like. Once you figure out how many amps per day you use, then you can see how many panels it will take to achieve the desired effect... THEN you have to make sure there is room on the roof of your RV for these panels. OK, let's sort this out...For us, we wanted to be able to run our LED lights, our furnace when needed, our Fantastic Fan, a small 12v fan, the TV and satellite receiver, the radio and our laptops. We also needed to be able to charge our cell phone, NiMH batteries for the metal detector and GPS, an electric razor, the charger for our battery powered tools, etc. We don't care about the microwave and we knew from the get-go that you can't run the A/C off of a few solar panels.
 Now don't think we want to run all these things all day, every day. On a daily basis we might use 1 or 2 lights in the evening, the 12v fan all night long, and the TV and satellite receiver for an hour or 2. Not really a lot of power consumption but we do take into account the power leeches we have in the trailer. You know, the things that take power all the time like the propane leak detector, the battery charge controller, etc. Let's not forget the water pump when it kicks on when we use water. So how much did we need based on our amp usage?
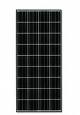 We found that we could get by with just one 135-watt panel. Our camper is only 19' long so free roof space is minimal. We had to make sure any panels would not be shaded by any of the things already on the roof. We measured the space we could use and started looking for panels. Due to bad experiences with Chinese and no-name products, we didn't even consider them. Our research led us to Evergreen brand solar panels but it turns out they are just too big. We could only fit 1 205-watt panel on the roof and we wanted more wattage than that. The search goes on...
Since solar panel models change quickly, the ones we used are no longer manufactured. You can browse solar panels and accessories here or simply do a quick Google search.
OK, after all that all we have done is determine what our solar panels will be. And you thought this was going to be a quick lesson...
Charge Controller
A what? Yep, you need a gizmo called a charge controller. A charge controller regulates the voltage and current coming from your new solar panels going to your batteries. Most 12 volt panels put out about 16 to 20 volts, so if there is no regulation the batteries will be damaged from overcharging. Most batteries need around 14 to 14.8 volts to get fully charged. It's a complicated task so getting the right charge controller is extremely important. Let's see what our options are... 2 stage? 3 stage? PWM? MPPT?
What does it all mean?! Let's break it down...
A 2 stage charger will charge to a certain point then simply reduce the power from the panels even though the batteries are not fully charged. This is not a good thing. The ever popular Solar Boost 2000E is a 2 stage charge controller and you do not want one. Don't let anyone talk you into one; you do not want a 2 stage charger.
A 3 stage charger using PWM (Pulse Width Modulation), as the name implies, charges your batteries in 3 stages.
- BULK : During the Bulk phase of the charge cycle, the voltage gradually rises to the Bulk level (usually 14.4 to 14.8 volts) while the batteries draw maximum current. When Bulk level voltage is reached the absorption stage begins.
- ABSORPTION : During this phase the voltage is maintained at bulk voltage level for a specified time while the current gradually tapers off as the batteries charge up.
- FLOAT : After the absorption time passes the voltage is lowered to float level (usually 13.4 to 13.7 volts) and the batteries draw a small maintenance current until the next cycle.
MPPT or Maximum Power Point Tracking - this is electronic tracking and has nothing to do with moving the panels. Instead, the controller looks at the output of the panels, and compares it to the battery voltage. It then figures out what is the best power that the panel can put out to charge the battery. It takes this and converts it to best voltage to get maximum AMPS into the battery. It is AMPS into the battery that counts.
| VOLTAGE | STATE OF CHARGE |
|---|---|
| 12.6 + | 100% |
| 12.5 | 90% |
| 12.42 | 80% |
| 12.32 | 70% |
| 12.20 | 60% |
| 12.06 | 50% |
| 11.9 | 40% |
| 11.75 | 30% |
| 11.58 | 20% |
| 11.31 | 10% |
| 10.5 | 0% |
Make sure the charge controller you select has a high enough amp rating for your solar panels. To find out how many amps your panels produce, simply look on the label or read the spec sheet. Whatever total you get, add 25% of that to it to get a final number. This allows for excessive power generation caused by "edge of cloud" effects. For example, you have 2 panels and they each produce 9 amps. Together that is 18 amps. 18 x 25% = 4.5 therefore 18 + 4.5 = 22.5 amps. You should look for a charge controller that rates at a minimum of 25 amps. Confused yet? Don't worry, I had to read that a few times myself before it sank in.
 So now you are an expert on charge controllers... oh wait. You're not? Neither are we but with what we learned we decided to go with a 3 stage MPPT charge controller.
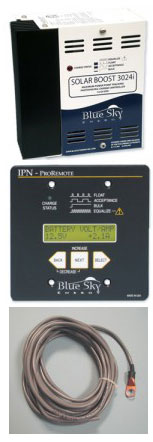
Once again, lots of research comes in handy. MorningStar brand was our first choice but they didn't have a model with the specs we wanted. So we opted for the Blue Sky Solar Boost 3024iL. This unit is rated at 40A at 12V. We also purchased the optional remote temperature sensor and the remote display/battery monitor.
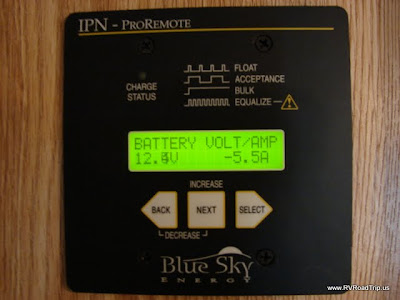
The IPNPRO-S Remote Display for the SB3024iL combines full-featured charge controller monitoring and battery system monitoring into a single user friendly remote display. With the IPN-ProRemote you no longer have to guess how much battery capacity remains. A high accuracy calculation of remaining battery capacity compensates for a variety of factors including charge/discharge current, battery size, type, temperature and how the battery was brought back to full charge. It even learns from past battery behavior to continuously improve accuracy! By combining an advanced battery system monitor and charge controller display into a single unit, the IPN-Pro Remote eliminates the need for a separate battery monitor. It also simplifies installation and eliminates the headaches of trying to setup and synchronize separate charge controller and battery monitor systems.
Applying the proper charge voltage is critical for achieving optimum battery performance and longevity. The ideal charge voltage required by batteries changes with battery temperature. The battery temperature sensor allows the charge controller to continuously adjust charge voltage based on actual battery temperature. Temperature compensation of charge voltage assures that the battery receives the proper charge voltage as battery temperature changes during normal operation.
Now you're armed with information about solar panels and charge controllers. This will help you when you are shopping for these components. Remember what you've learned and don't let a salesman or anyone else talk you into something less.
Batteries
We'll only discuss batteries that are deep cycle. Two major construction types are flooded (wet) and AGM (Absorbed Glass Mat). If you're like us, you're most familiar with flooded wet cell batteries. Flooded batteries may be standard, with removable caps for adding distilled water, or the so-called "maintenance free" which means they are designed to die about a week after the warranty runs out.
AGM (Absorption Glass Mat) sealed battery technology was originally developed for military aircraft where power, weight, safety, and reliability were paramount considerations. AGM technology has become the next step in the evolution of both starting and deep cycle sealed batteries for marine, RV, and aviation applications. In AGM sealed batteries, the acid is absorbed between the plates and immobilized by a very fine fiberglass mat. No silica gel is necessary. This glass mat absorbs and immobilizes the acid while still keeping the acid available to the plates. This allows a fast reaction between acid and plate material. The AGM battery has an extremely low internal electrical resistance. This, combined with faster acid migration, allows the AGM batteries to deliver and absorb higher rates of amperage than other sealed batteries during discharging and charging. AGM batteries are more expensive but worth getting if you can afford it.
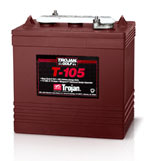 Our budget didn't allow for AGM batteries so we went with flooded wet cell batteries, specifically Energizer 6v golf cart batteries from Sam's Club. We planned to get Trojans but were able to get these for such a great price, we had to give them a try. There are other brands you can go with and you'll probably be fine, but we wanted to at least get something that other people had experience with.
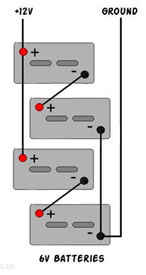
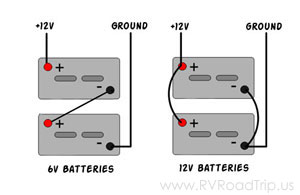 Since these golf cart batteries are only 6v, you need at least 2 to achieve 12v. You can have 2, 4, 6... however many pairs you have room for. We have room for 4 so we went ahead and put in 4 batteries.
The Energizers are rated at 220 AH each at 6v. Wired in series/parallel, we have 440 AH at 12v coming from true deep cycle batteries. Ahh, boondocking goodness...
 We keep an eye on the water level of our batteries and only use distilled water to refill them, not overfill them. We use Water Miser caps so we don't have to add water nearly as often. Our battery compartment is vented so the dangerous, explosive gases do not build up. Visit this page for tons of battery information.
Now you are a battery genius! Aww, go ahead and claim the title. You probably now know more than most people who sell batteries at retail so instead of being the greeter at Wal-Mart, you can work in the Automotive department. Anyway...
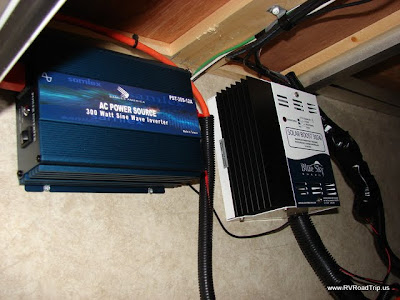
Inverters
 Inverters do a simple job, they convert 12v DC electricity into 110v AC electricity. They take the juice from your batteries and change it so your computer, coffee maker and other gadgets can use it. There are two general types of power inverters: pure sine wave or modified sine wave. Pure sine wave inverters produce power that is either identical or sometimes slightly better to power from the power company. Modified sine wave power inverters produce a power wave that is sufficient for most devices but is not exactly the same as electricity from the power company.
You will need to make sure your inverter wattage is rated high enough to power the things you want to use. We suggest you get one that is a little larger than what you think you will need.
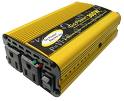
We have a small 75-watt modified sine wave unit that plugs into a cigarette lighter receptacle for use in the truck. It runs a laptop easily. Some household items will run just fine off of a modified sine wave inverter but some will not. Most items with motors and some electronics will need a pure sine wave inverter. We only have a few items that require a pure sine wave inverter so we have a Samlex PST-30S-12A for that. This runs anything we want to run except the microwave and A/C and we don't care about running those. A decent modified sine wave inverter rated at 600 watts is the Go Power! GP-600. If you need 1500 watts, get model GP-SW1500-12. Need 2000 watts, get model GP-SW2000-12. Need 3000 watts, get model GP-SW3000-12.
The Installation
OK, now that we have everything that we ordered we quickly found out we didn't have everything we needed. Whodathunk that you needed so many other accessories just to install a solar power system in your camper?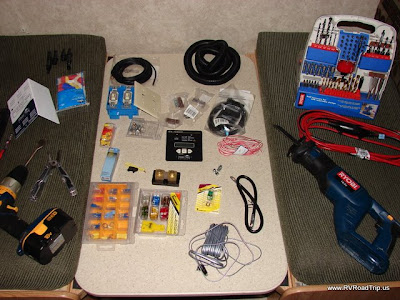
Oddly enough, the shunt that came with the remote display didn't come with any shunt wire. Shunt wire is a 22 AWG twisted pair wire that connects from the shunt to the remote display. This is not the wire that connects from the remote display to the charge controller, luckily that wire was included with the display. We'll also need the screws that will hold the panel mounts to the roof of the camper. We knew this part beforehand but didn't know what size or how many to get until we saw the mounts. Also, connectors to go on to the ends of the myriad of wires. The small ones are cheap and easy to get but the larger ones turned out to be quite expensive, about $3 per piece!
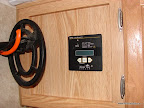 Now a hard decision, where to mount the remote display and the charge controller? The remote display needed to be where we could easily see it but we also wanted to make sure the lights from it didn't bother us at night. We opted to mount it above the bed in the wall of the overhead cabinet next to the metal detector. It is a flush mounted unit so it needed about an inch of depth behind it and a path to route the wires from it to the charge controller and the shunt. The hardest part about this was cutting the hole to mount it. The wood is so thin and flimsy that it was hard to cut a good hole. Luckily the display has about a 1/2" overhang so it covers up any flaws in my hole cutting ability. Not that I am admitting any. :)
The charge controller needs to be close to the batteries and they sit on the tongue of the camper. This necessitates mounting the charge controller at the front of the camper under the bed on the front wall. There's no need to look at the charge controller once everything is hooked up so it is OK for it be in a semi-inaccessible spot. We did have to keep in mind that two 6 AWG wires would be running to this location from the solar panels on the roof. And that two 4 AWG wires would be running from it to the battery. But wait! We also need to run a ground wire from the charge controller to the frame. But wait again! Turns out that mounting the shunt inside near the charge controller would cause us to do more wiring.
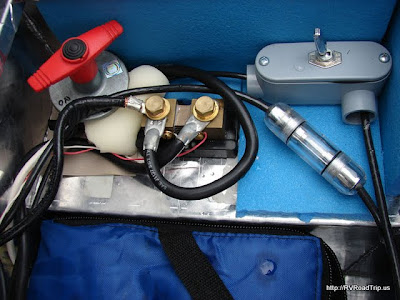
All connections to the negative side of the batteries must be done AFTER the shunt (except the battery temperature sensor which attaches directly to the battery), so we decided to mount the shunt in the same box as the batteries. Confused yet? We were, too at first. But pictures really help! Here's the shunt and the 50A fuse on the hot wire, these are located in the aluminum box that sits on the tongue of the camper. Not real pretty, but no one sees this but me.
The Samlex 300-watt Pure Sine Wave Inverter was mounted next to the charge controller and power for it was gained by tapping into the big wires that run from the battery to the charge controller. A 30A fuse was put inline on the hot wire to the inverter. A long wire was run to the rear of the camper where the TV resides. At this location, we can plug in the few items we have that need an inverter. The inverter was mounted under the bed in the pass-through storage area so we could easily reach the ON/OFF switch from the cargo door. I mounted the inverter so that it's cooling fan would blow on the heat sink of the charge controller, maybe this will aid in cooling. Maybe not.
I got to thinking that there might be an instance where I need to disconnect the power that comes from the panels before it gets to the charge controller. You know, if I ever had to change the controller or maybe if I wanted to move it to a better spot one day. So I picked up some 20A switches, a box to mount them in and a cover at Lowe's. I connected the 2 wires from the panels to these 2 switches and can simply flip them on and off as needed.
After all that, the wires are run and where they need to be but not yet connected. When hooking up the charge controller and shunt it is imperative that you read the directions carefully... and follow them. Although Blue Sky's disclaimer isn't as funny as ours (see below), they are clear that they will not warranty any damage caused by you or your negligence. The manuals for the display and controller are filled with warnings and precautions and you will do well to heed them. We took a lot of time to become very familiar with everything before attempting to connect it all up. When you spend $343 for a charge controller and $212 for the remote display, you really don't want to burn it up because of something you did wrong.
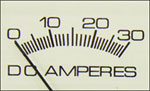
Here is the IPNPRO-S Remote Display powered up. I am so glad I decided to fork over the extra $212 for this display. It allows programming of the charge controller without having to flip tiny jumpers on the charge controller itself and it provides an amazing amount of information about the system. On the default screen, it shows the battery voltage and how many amps you are currently drawing.
Cynthia and I installed the solar panels on the roof of the camper today. We lifted the panels up to the roof and placed them in the position we wanted them in... not too close to the front of the camper so wind would get under them and not too close to the A/C as it might cast a shadow on them. We marked the holes in the feet with a pencil then secured each foot with 3 1" screws for a total of 12 screws securing each panel to the roof. Each foot was then liberally coated with Dicor self-leveling sealer around all the edges and covering the screw heads. The panel was then set in place and secured with the existing thumb screws. We repeated this process for the other panel.
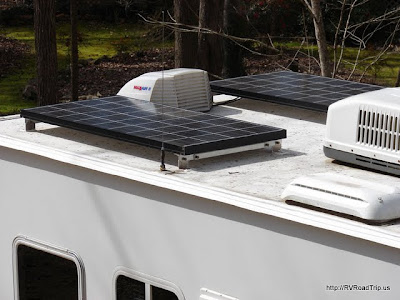
We connected the panels together with MC4 Multibranch connectors, this resulted in the panel being wired in parallel. We did this so that if one panel got shaded it would not affect the output of the other panel. We then ran the wires through the roof vent into the camper. We just did not want to drill a hole through the roof and through the ceiling inside. The wires then run into the overhead cabinet above the bed so you only see about 9" of the wire. The wire runs through two 20A switches which act as disconnects in case we need to shut the panels off for any reason. We connected all the wiring, doubled checked everything and flipped the switches. The charge light immediately lit up and the remote display starting showing that we were generating our own electricity!
Total cost of parts in 2010 was just under $1800.00 US. In 2026, it is cheaper. So, was it worth it? If we save an average of $18 for each night we don't have to pay a campground fee, we will have "made" our money back in just 100 nights.
Solar has come way down in price since we did our installation. Now, just about everyone can afford to have solar!
Here is a link to several kits at great prices.
Disclaimer: Use common sense, borrow some if you are out. We aren't responsible for things you do after you read about things we did. Things that worked for us may not work for you. Seek professional help if you have any doubts.