Hilarious video of our 2014 road trip to 22 states and 15 national parks...


RV 12v Information - Everything You Need to Know
Understanding and Maintaining Your RV's 12v System
12v Systems | Batteries | Battery Lifespan | Temperature Effects
Charging & Maintenance | State of Charge | Battery Testing | Winter Storage
12v Systems | Batteries | Battery Lifespan | Temperature Effects
Charging & Maintenance | State of Charge | Battery Testing | Winter Storage
12v Systems
The information on this page is for owners of campervans, pop-ups, travel trailers, 5th wheel RVs and motorhomes. An RV allows us to run a lot of things on 12v instead of requiring 110v. The biggest exclusion to this is your air conditioner. You can run just about everything else such as a microwave oven, TV, satellite system, computer, lighting and more. The 12v system on an RV is not that complicated but can easily frustrate the best of us. Why do you think men have a bald spot on their head? From scratching it while pondering a problem! Today we'll learn a little about the 12v system and how it is used in the average RV.The 12v system on an RV allows you to operate your lights and appliances without being connected to shore power (plugged into a 30a or 50a outlet for electricity). The 12v system on an RV consists of a few basic components and they are shown in the diagram below. Not all RVs are exactly the same so yours may be different.
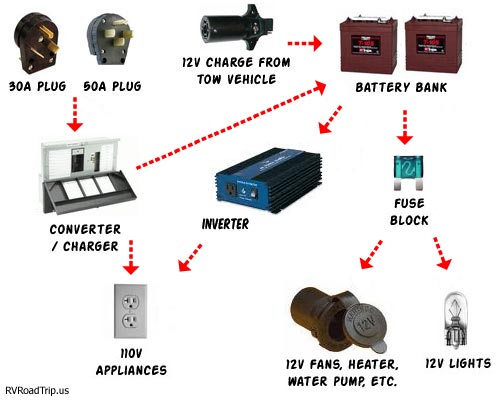
Nothing to it, right? Even though the setup is basic, you can run most of your electrical goodies from the juice stored in your battery bank. All you have to do is recharge your batteries as needed and we'll get into how to do that further down the page.
Batteries
A battery is designed to store and release electricity. You're probably most familiar with car batteries used for starting. These are sold by many box retailers and automotive stores and are rated by their cold cranking amps (CCA). This is not the type of battery you want for your RV. You may also be familiar with marine or "hybrid" batteries which are used for starting boat motors and powering boat 12v systems. This type of battery can be used but it will die sooner than later since it is a dual purpose battery and not best suited for one particular job. What you're looking for is a true deep cycle battery. These are sold by several manufacturers and brand loyalty exists among them all. Interstate, Energizer, Trojan, Rolls-Surrette and Concorde... just to name a few. I won't say one brand is better than another but I will say I prefer Trojan brand deep cycle batteries.Deep cycle batteries are designed to be discharged and recharged many times. The major construction types are flooded (wet cell), gel, and AGM (absorbed glass mat). AGM batteries are also sometimes called "starved electrolyte" or "dry", because the fiberglass mat is only 95% saturated with Sulfuric acid and there is no excess liquid. Flooded may be standard with removable caps, or "maintenance free" without caps. Since you can't add water to maintenance free batteries, I believe "maintenance free" means the battery will last about 1 week longer than the warranty.
Sealed gel and AGM batteries offer the convenience of no maintenance and produce less gas, so at first glance, they may appear more attractive than standard flooded cell batteries. The down side of these batteries is that they require precise control of the charging process to prevent permanent damage by overcharging. They also tend to be significantly more expensive. I think that standard wet cell batteries will perform better and last longer in most RV applications.
Typical efficiency in a lead-acid battery is 85-95%. True deep cycle AGMs can approach 98%. Practically all batteries used in RVs are lead-acid type batteries. This includes the standard flooded (wet cell) batteries, gel, and AGM. They all use the same chemistry, although the actual construction of the plates varies.
Deep cycle batteries are often rated in AmpHours. AmpHour rating of battery capacity is calculated by multiplying the current (amps) by time (hours) the current is drawn. For example: A battery which can deliver 5 amps for 20 hours before being discharged would have a 100 AmpHour battery rating (5 X 20= 100).
You may also see batteries rated with a Reserve Capacity. Reserve Capacity is the number of minutes a new, fully charged battery at 80°F will sustain a discharge load of 25 amps to a cut-off voltage of 1.75 volts per cell (10.5V on 12V battery). This battery rating measures more of a continuous load on the battery. For RV use, this rating is a little less useful, as the common loads that RV use puts on a battery are a lot less than that 25 amp load used to determine Reserve Capacity.
Battery Lifespan
 The lifespan of your deep cycle battery will vary considerably with how it is used, how it is maintained and charged, the temperature, etc. If a battery is discharged to 50% every day, it will last about twice as long as if it is cycled to 80% depth of discharge (DOD). If cycled only 10% DOD, it will last about 5 times as long as one cycled to 50%. The most practical number to use is 50% DOD on a regular basis.
This does NOT mean you cannot go to 80% once in a while. It's just that when designing a system when you have some idea of the loads, you should figure on an average DOD of around 50% for the best storage vs. cost factor. Also, there is an upper limit - a battery that is continually cycled 5% or less will usually not last as long as one cycled down 10%. This happens because at very shallow cycles, the lead dioxide tends to build up in clumps on the positive plates rather than an even film.
Lifespan and performance are what you are looking for in an RV battery. The following chart gives a general idea about the lifespan of certain battery types. These are averages and your battery life will vary.
| BATTERY TYPE | LIFESPAN |
|---|---|
| Starting | 3-12 Months |
| Marine | 1-6 Years |
| Golf Cart | 2-7 Years |
| AGM Deep Cycle | 4-7 Years |
| L-16 Deep Cycle | 4-8 Years |
| Gel Deep Cycle | 2-5 Years |
| Rolls-Surette | 7-15 Years |
Your RV probably came from the dealer with just one Group 24 deep cycle or marine battery installed. You may have room for additional batteries and if you want to be able to camp without shore power for longer periods, you'll want as many batteries as you can fit. Batteries come in all different sizes. Many have "group" sizes, which is based upon the physical size and terminal placement, it is not a measure of battery capacity. Typical BCI codes are group U1, 24, 27, and 31. Industrial batteries are usually designated by a part number such as "FS" for floor sweeper, or "GC" for golf cart. Many batteries follow no particular code, and are just manufacturer's part numbers. Other standard size codes are 4D & 8D, large industrial batteries, commonly used in solar electric systems. Here's a quick list of various batteries and their sizes.
| BATTERY TYPE | AMPHOURS | VOLTAGE |
|---|---|---|
| U1 | 34 to 40 Amp hours | 12 volts |
| Group 24 | 70-85 Amp hours | 12 volts |
| Group 27 | 85-105 Amp hours | 12 volts |
| Group 31 | 95-125 Amp hours | 12 volts |
| 4-D | 180-215 Amp hours | 12 volts |
| 8-D | 225-255 Amp hours | 12 volts |
| Golf Cart & T-105 | 180 to 220 Amp hours | 6 volts |
| L-16, L16HC etc. | 340 to 415 Amp hours | 6 volts |
If you only have room for one battery, get the best 12v deep cycle battery you can afford. If you have room for 2 or 4 batteries, you might want to consider using 6v golf cart batteries. They are true deep cycle batteries and will last a lot longer than most common 12v batteries in your RV. Golf cart batteries have a higher capacity than group 24 and 27 batteries... a pair of group 24 12v batteries only provides 140-170 AmpHours of capacity, whereas a pair of golf cart batteries provides 180-220 AmpHours.
If you decide to change over to the 6v golf cart batteries, you must make an important wiring change. Most rigs that have 2 or more 12v batteries have them wired in parallel. When going to the 6v batteries, you must wire pairs of them in series to produce the needed 12 volts. This is actually simpler than it sounds... see the image below.
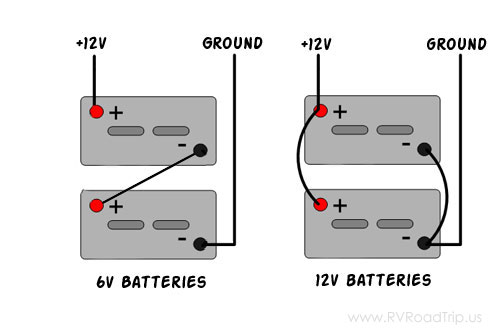
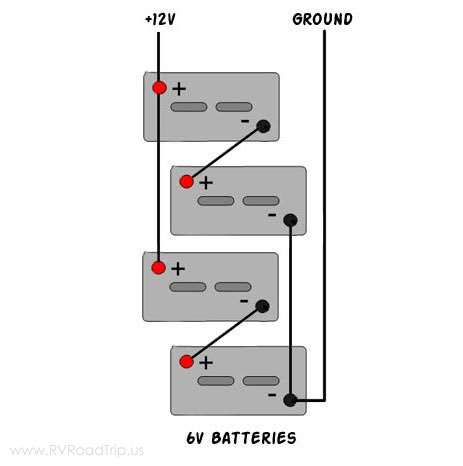
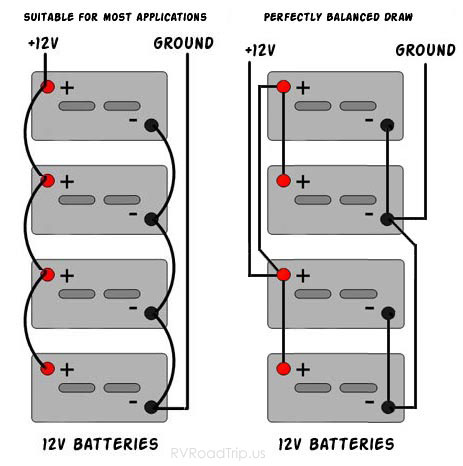
When installing new batteries, mark the cables so you do not forget which one is positive and negative. If you are changing over from a set of 12v batteries to a pair or set of 6v batteries, some changes in cabling will be required (see above image). If you are adding more than 2 batteries, see the image below for a wiring example. If you have any doubts about doing this, seek professional help. :)
Always remove the negative cable first when disconnecting a battery and attach the positive first when installing a battery. This reduces the risk of arcing. Always make sure your connections are extremely clean and free of any corrosion. Most auto parts stores sell a corrosion preventative if you need it. Never place batteries in an unvented compartment or in an area where sparks may occur. If you do, you will likely cause an explosion and explosions can result in serious injury or death... not to mention the loss of your RV and everything in it.
Be sure to secure your batteries with straps or brackets to prevent movement. An unsecured battery may tip over and spill acid or may short out and cause a fire. Fires are like explosions and can result in serious injury or death... not to mention the loss of your RV and everything in it. You see the point here? Good, it's important.
Temperature Effects on Batteries
 Battery capacity (how many AmpHours it can hold) is reduced as temperature goes down, and increased as temperature goes up. This is why your car battery dies on a cold morning even though it worked fine the day before. If your batteries spend part of the year in the cold, the reduced capacity has to be taken into account when sizing the system batteries. The standard rating for batteries is at room temperature, about 77°F. At approximately -22°F battery AH capacity drops to 50%. At freezing, capacity is reduced by 20%. Capacity is increased at higher temperatures - at 122°F, battery capacity would be about 12% higher.
Battery charging voltage also changes with temperature. It will vary from about 2.74v per cell (16.4v) at -40°F to 2.3v per cell (13.8v) at 122°F. This is why you should have temperature compensation on your charger or charge control if your batteries are outside and/or subject to wide temperature variations. Another complication is that large battery banks make up a large thermal mass.
Thermal mass means that because they have so much mass, they will change internal temperature much slower than the surrounding air temperature. A large insulated battery bank may vary as little as 10 degrees over 24 hours internally, even though the air temperature varies from 20 to 70 degrees. For this reason, external temperature sensors should be attached to one of the terminals, and bundled up a little with some type of insulation on the terminal. The sensor will then read very close to the actual internal battery temperature.
Even though battery capacity at high temperatures is higher, battery life is shortened. Battery capacity is reduced by 50% at -22°F - but battery life increases by about 60%. Battery life is reduced at higher temperatures - for every 15°F over 77, battery life is cut in half. This holds true for any type of lead acid battery, whether sealed, gel, AGM, industrial or whatever. This is actually not as bad as it seems, as the battery will tend to average out the good and bad times.
One last note on temperatures - in some places that have extremely cold or hot conditions, batteries may be sold locally that are not standard electrolyte (acid) strengths. The electrolyte may be stronger (for cold) or weaker (for very hot) climates. In such cases, the specific gravity and the voltages may vary.
Battery Charging and Maintenance
 Battery charging takes place in 3 basic stages:
Bulk, Absorption, and Float.
Bulk Charge - The first stage of 3-stage battery charging. Current is sent to batteries at the maximum safe rate they will accept until voltage rises to near (80-90%) full charge level. Voltages at this stage typically range from 10.5 volts to 15 volts.
 Absorption Charge - The 2nd stage of 3-stage battery charging. Voltage remains constant and current gradually tapers off as internal resistance increases during charging. It is during this stage that the charger puts out maximum voltage. Voltages at this stage are typically around 14.2 to 15.5 volts.
Float Charge - The 3rd stage of 3-stage battery charging. After batteries reach full charge, charging voltage is reduced to a lower level (typically 12.8 to 13.2) to reduce gassing and prolong battery life. This is often referred to as a maintenance or trickle charge, since it's main purpose is to keep an already charged battery from discharging.
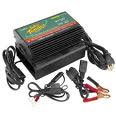
Most garage and automotive type battery chargers are bulk charge only, and have little voltage regulation. They are fine for a quick boost to low batteries, but not to leave on for long periods. Some newer models have a float charging feature built in. If these are set to the correct voltages for your batteries, they will keep the batteries charged without damage.
Charging at 14.4v (14.8v for Trojan T-105 batteries) will give you a 100% charge on lead acid batteries. In any case, always follow your battery manufacturer's charging recommendations! Once the charging voltage reaches 2.583 volts per cell, charging should stop or be reduced to a trickle charge. Note that flooded batteries must bubble somewhat to insure a full charge, and to mix the electrolyte. Float voltage for lead acid batteries should be about 2.15 to 2.23 volts per cell, or about 12.9-13.4 volts for a 12 volt battery. At higher temperatures (over 85°F) this should be reduced to about 2.10 volts per cell.
Never add acid to a battery except to replace spilled liquid. Distilled water should be used to top off non-sealed batteries. Flooded battery life can be extended if an equalizing charge is applied about every 30 days. This is a charge that is about 10% higher than normal full charge voltage, and is applied for about 2 hours. This makes sure that all the cells are equally charged, and the gas bubbles mix the electrolyte. If the liquid in standard wet cells is not mixed, the electrolyte becomes "stratified". You can have very strong solution at the bottom, and very weak at the top of the cell. With stratification, you can test a battery with a hydrometer and get readings that are quite a ways off. If you cannot equalize for some reason, you should let the battery sit for at least 24 hours and then use the hydrometer. AGM and gelled should be equalized 2-4 times a year at most - check the manufacturers recommendations, especially on gelled. If you need a good charger that can equalize, a Smart Battery Charger is a very good investment!
State of Charge
(10.5 volts = fully discharged at 77°F for a 12v system) If the volts per cell is more than a .2 volt difference between each cell, you need to equalize, your batteries are going bad, or they may be sulfated. These voltages are for batteries that have been at rest for 3 hours or more. For longest life, batteries should stay in the green. Occasional dips into the yellow are not harmful, but continual discharges to those levels will shorten battery life. It is important to realize that voltage measurements are approximate. The best determination is to measure the specific gravity, but in many batteries this is difficult or impossible.| State of Charge | 12v Battery | Volts Per Cell |
|---|---|---|
| 100% | 12.6+ | 2.12 |
| 90% | 12.5 | 2.08 |
| 80% | 12.42 | 2.07 |
| 70% | 12.32 | 2.05 |
| 60% | 12.20 | 2.03 |
| 50% | 12.06 | 2.01 |
| 40% | 11.9 | 1.98 |
| 30% | 11.75 | 1.96 |
| 20% | 11.58 | 1.93 |
| 10% | 11.31 | 1.89 |
| 0 | 10.5 | 1.75 |
If the battery has been charging, then it's important to let the battery rest for several hours without a load or charger connected to stabilize before testing. Otherwise you'll get a high reading caused by "surface charge". You should also get a good digital voltmeter.... it's the only meter that will offer the necessary accuracy to properly test your batteries.
You should recharge a deep cycle battery as soon as possible after each use. It is very hard on a deep cycle battery to sit for extended periods in a partially discharged state. Most RVs provide some sort of converter/charger to "charge" the batteries when you're plugged into shore power. You can also use a generator if you have one or solar panels if you have those. In a pinch, you can use your tow vehicle's alternator but that isn't very practical.
Depending on the age of your RV, the converter in your RV may not be designed to be a decent battery charger. It's main purpose is to provide 12 volt power for your RV while you are plugged in to shore power. Since the converter is designed to not exceed a voltage of about 13.5 volts, it will never fully charge your batteries. Also, after it has partially charged your batteries, it will then begin to boil off electrolyte since the "float" voltage is too high. If you plug your RV into shore power for months at a time, you must keep a close eye on your battery's electrolyte level. It is very common for a converter to boil a battery dry.
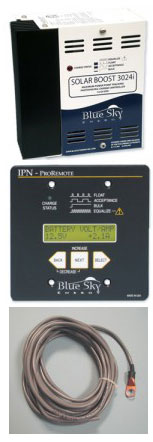
Newer RVs will have better converters that include a 3 stage battery charger as part of the unit. If you ever need to replace a old converter, make sure to get one with a 3 stage charger built in. If you have or are considering solar panels, you might want to read the information we have on our RV Solar Installation page.
Battery Testing
As stated earlier, if the battery has been charging, then it's important to let the battery rest for several hours without a load or charger connected to stabilize before testing. While you're waiting, make sure there is no physical damage to your batteries and that there is no corrosion on the wiring or terminals. Check that the straps or clamps securing the battery are in good condition and are fastened properly. Your electrolyte level is good because we just know you checked that before charging the batteries. ;) If you find a problem, fix it as soon as possible before it becomes a bigger problem.Disconnect your battery before performing an open circuit test. The table below will help you determine the battery's state of charge. The best way to measure the state of charge is to check the specific gravity in each cell with a hydrometer. If the battery is sealed, then the correct procedure to test it is to measure the battery's voltage with a good quality digital DC voltmeter with an accuracy of .5% or better. Voltages are shown for both 12 volt and 6 volt batteries.
Battery Voltage |
State-of-charge |
Specific Gravity |
Check the specific gravity in each cell with a hydrometer and the battery terminal voltage with a digital voltmeter. If the state of charge is below 75% using either the specific gravity or voltage test then the battery needs to be recharged before proceeding. Replace the battery, if one or more of the following conditions occur:
- If there is a .050 or more difference in the specific gravity reading between the highest and lowest cell, you have a weak or dead cell(s),
- If the battery will not recharge to a 75% or more state of charge level.
- If digital voltmeter connected to the battery terminals indicates 0 volts, you have an open cell, or if the digital voltmeter indicates 10.45 to 10.65 volts (5.2 to 5.35 volts for a 6 volt battery), you have a shorted cell.
Winter Storage
A charged battery will not freeze but a partially discharged battery can. If you have a way to keep your battery charged during winter storage, you can safely leave it in your RV. You can use solar panels or a float charger to do this. If you cannot keep the battery charged while in storage, take it out of the RV and take it home with you. Store it in a safe location where you can keep a float charger attached to it. Doing this simple step will ensure long life for your battery.Battery Knowledge
Batteries are heavy. Take this into consideration when moving them or selecting a location to mount them.Nearly all batteries will not reach full capacity until cycled 10-30 times. A brand new battery will have a capacity of about 5-10% less than the rated capacity.
In situations where multiple batteries are connected in series, parallel or series/parallel, replacement batteries should be the same size, type and manufacturer (if possible). Age and usage level should be the same as the companion batteries. Do not put a new battery in a pack which is more than 6 months old or has more than 75 cycles. Either replace with all new or use a good used battery.
The vent caps on flooded batteries should remain on the battery while charging. This prevents a lot of the water loss and splashing that may occur when they are bubbling.
When you first buy a new set of flooded (wet) batteries, you should fully charge and equalize them, and then take a hydrometer reading for future reference. Since not all batteries have exactly the same acid strength, this will give you a baseline for future readings.
When using a small solar panel to keep a float charge on a battery (without using a charge controller), choose a panel that will give a maximum output of about 1/300th to 1/1000th of the AmpHour capacity. For a pair of golf cart batteries, that would be about a 1 to 5 watt panel - the smaller panel if you get 5 or more hours of sun per day, the larger one for those long cloudy winter days in the Northeast.
Lead-Acid batteries do not have a memory, and the rumor that they should be fully discharged to avoid this "memory" is totally false and will lead to early battery failure.
Inactivity can be extremely harmful to a battery. It is a bad idea to buy new batteries and "save" them for later. Either buy them when you need them, or keep them on a continual trickle charge. The best thing to do if you buy them is to use them.
Only clean water should be used for cleaning the outside of batteries. Solvents or spray cleaners should not be used.
Disclaimer: Use common sense, borrow some if you are out. We aren't responsible for things you do after you read about things we did. Things that worked for us may not work for you. Seek professional help if you have any doubts.