Hilarious video of our 2014 road trip to 22 states and 15 national parks...


RV Water Heater Maintenance
This article depicts a Suburban brand water heater. Consult your owners manual to be sure the information contained on this page coincides with your unit. Atwood is another popular brand of water heater. It is our understanding that most (if not all) Atwood water heaters do not have an anode rod. Atwood uses an aluminum tank instead of steel, and thus does not require an anode rod. Otherwise, maintenance is generally the same procedure on both brands.Before you begin, be sure to turn off the water supply, make sure your water pump is off and open both the hot and cold faucets inside your RV to relieve the pressure in the system. If you don't, the anode rod will shoot out like a missile when you start taking it out.
At least twice a year, you want to visually inspect your water heater for corrosion, loose connections, insect intrusion and/or nest building, etc. If you find a problem, immediately have it fixed by someone qualified to do the job. Just about anyone can remove dead bugs or a wasp nest, but messing around with a bad propane or electrical connection is serious business and best left to a professional. Walk around your camper until you find a cover that looks like this: (Ours has an aftermarket insect screen but yours may not.)

A little plastic or metal latch holds the door shut. Twist the latch and open the door. If your latch is plastic, it will break one day. If you are driving when it breaks, your water heater door will be ripped off by the wind. Now would be a good time to replace it with a metal latch. To remove the latch, push in on the part you grab with your fingers and fold it in. While pushing in, slide the latch off. You'll need the door open and use your other hand to hold the latch from the back side. Piece o' cake... the 2nd time you do it.
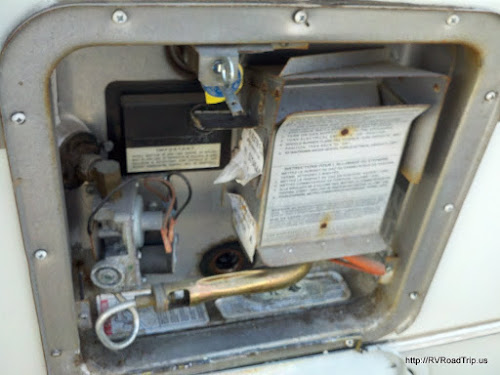
Once you have the water heater door open, this is what you'll see. This picture is from a gas only unit, so if yours is gas and electric, it will be slightly different. You will also have an On/Off switch for the electric part and a electric heating element behind a plastic cover.
Every year you want to remove the anode rod from your water heater and flush out the tank. If your anode has deteriorated significantly, it will need to be replaced. Here is what you'll need to have on hand:
The anode rod is located at the bottom of the water heater in the center. It will very likely be rusted but that is normal. You can spray a little PB Blaster on it to loosen it up if need be.
Once you have the anode rod out and the water has drained out, stick your finger inside and feel around as best you can. Feel all that gritty stuff? That's remnants of your old anode rod as well as corrosion from campground water supplies. Still think you don't need a water filter?
Take a hose with a pressure nozzle and spend about 15 minutes (yes, 15 minutes) and rinse out the tank through the anode rod hole. You can open the pressure relief valve at the top of the water heater to make draining faster or you can let the water "glug glug" out as this often helps get bigger chunks of stuff out. Spray water in and let it run back out repeatedly until you are satisfied that you have all debris out that you think you can possibly get out.
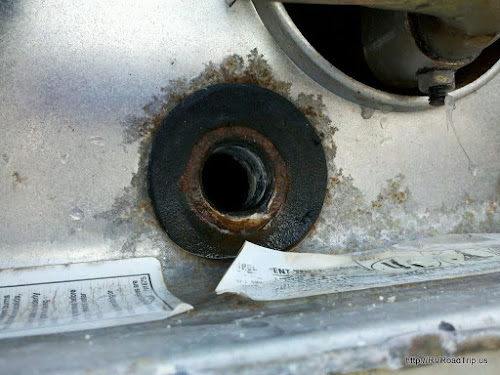
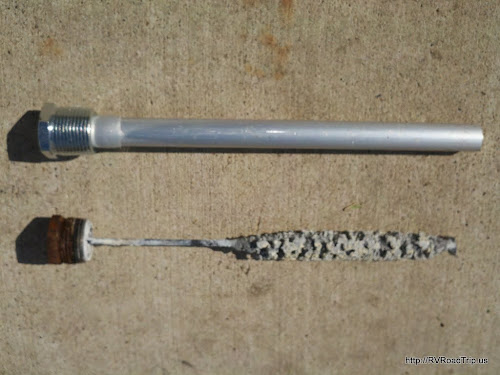
Here's what the anode rod hole looks like with the rod out. Next is a picture of an anode rod in very bad shape along side a brand new one.
Put a little Teflon tape or TFE paste on the threads of the new anode rod and thread it back in using your fingers. Snug it up using the tools being careful not to over tighten it. Make sure the pressure relief valve on the water heater is open then go back inside your RV and close any faucets you had open. Now go turn your water supply back on. You will hear the pressure relief valve hissing as the water heater fills pushing out the air. When water starts flowing out of the pressure relief valve without any air burping, go ahead and close it. Take a dry rag or paper towels and dry off the water heater so you can check for leaks around the anode rod. If it leaks, you will either need to snug it up a little more or remove it and apply more Teflon tape or TFE paste.
Here is what the new anode rod will look like installed.

This is a 30 minute or less job if you spend 15 minutes rinsing out the water heater, less if you don't. Doing this simple maintenance will allow your Suburban water heater to give you many, many years of service.