Hilarious video of our 2014 road trip to 22 states and 15 national parks...


Ram ProMaster RV Camper Van Conversion - Floor Plan
This is the original conversion we did. If you are looking for the index page of this project, click here. If you want to see the new build, click here.The Layout
Everything has a place and everything must be in its place when not in use.
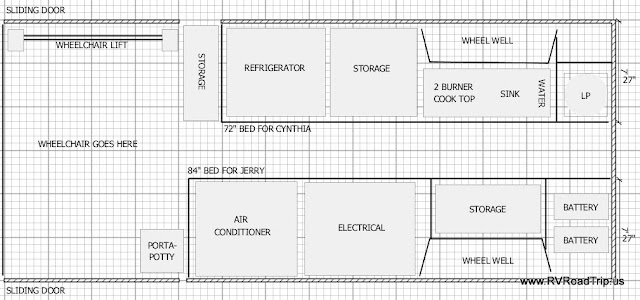
Our goal was to have a fully functional campervan that we can travel around the country in on our annual road trips as well as random vacations. It must provide us with a comfortable place to sleep, cool when it is hot outside and warm when it is cold outside, and have all the comforts of a regular RV (more or less). We will have between 200 and 400 watts of solar on the roof and 2 to 4 deep cycle batteries to store the power. This will allow us to always have electricity even when we are not in a campground or RV park. No, this amount of solar is not sufficient to run the A/C or microwave efficiently. We will not have a bathroom like most RVs would have, but we will have a portable toilet for emergencies or when it is not reasonable to go out to the campground bath house (bad weather, late at night, etc). We will have a small sink and cook top, as well as a 2.7 cubic ft refrigerator. The van is wired for 110v and 12v, with the 110v being supplied via a link to shore power. We may decide to add a generator if the need arises.
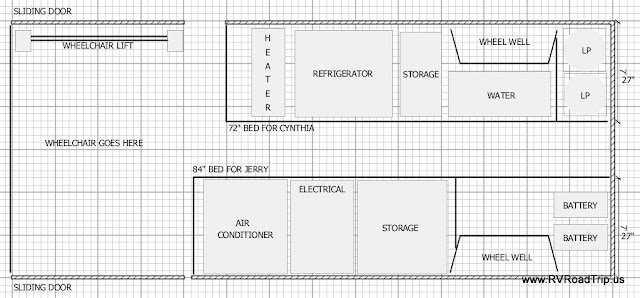
The basic floor plan, shown below, frames out the beds and what is below them and it also shows the wheelchair lift. The big open area is where the wheelchair is once it is lifted into the van. Since Cynthia is only 5'7", she gets the short side of the van. We call it the short side because the wheelchair lift takes up part of that side thus making allowable space less than the other side. Cynthia's side of the van will be dual purpose. At night, it will be her bed. Under that will be a 20lb LP tank, a fresh water tank, a 2 burner cook top and storage. A small 12v/110v refrigerator will be under there as well as a gas heater. During the day, we will slide her mattress over to Jerry's side and her platform will hinge up exposing the sink, cook top and counter space. The platform lid will secure to the van wall so you don't have to hold it up or prop it up. The sink will feature a low profile faucet and the cook top will be slightly recessed. Any unused space under her bed will be used for storage using drawers and doors.
This is our first draft of what we thought we would build. Click the image to enlarge it.
Note: This image is not to scale.
Jerry's bed is 80" long since he is 6' tall. His platform will also hinge up for access to underneath. Under his bed will be the electrical junction where the converter, solar charger, inverter and power distribution box will be. A set of deep cycle batteries will be next to that but in a sealed compartment vented to the outside. A standard 6,000 BTU window unit air conditioner will be mounted under the bed as well. Exhaust is vented to the outside through a 12" x 12" vent cut into the side of the van. An insulated housing directs all the hot air outside while 2 other vents in the van floor allow cooler, fresh air to come in to the sides of the A/C unit for efficiency. The front of the A/C will blow directly into the van. All remaining space will be storage.
This is the 2nd draft after we made some changes. Click the image to enlarge it.
Note: This image is not to scale.
Above each bed will be a cabinet, one side will house the microwave. The size of these overhead cabinets will be determined by how much headroom we need when moving about the van or getting in and out of bed. We do not want to be bumping our heads!
This is the 3rd draft after we made even more changes. Click the image to enlarge it.
Note: This image is not to scale.
In addition to the solar panels on the roof, we have installed a MaxxFan Model 7000K fan. This unit has the white cover, it is remote controlled and the lid will open and close automatically. Lighting inside the van will be all LED with a light appearance of 5000K (white, not yellowish light). There will several 110v, 12v and USB outlets in the camper to make charging things easy. For privacy, the windows can be covered with precut pieces of Reflectix. These are attached using velcro. At least two 12v cameras will be mounted outside with a small screen on the inside. This is so we can look outside without having to peek out the windows. Handy when you are stopping for the night in a Walmart parking lot or boondocking in the middle of nowhere and you hear a bear, or Bigfoot.
This is the 4th and final draft and is what we actually built. Click the image to enlarge it.
Note: This image is not to scale.


