Hilarious video of our 2014 road trip to 22 states and 15 national parks...


Onan 4K MicroQuiet Generator Maintenance
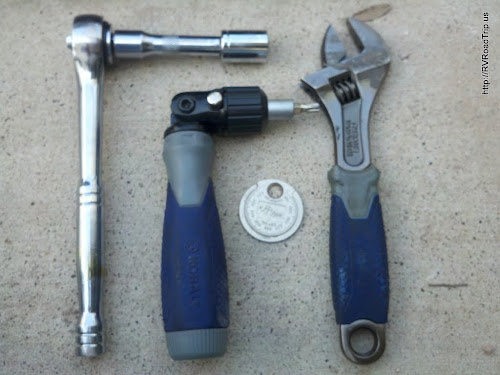
If you want your generator to last a long time, it is important to properly maintain it. If you lack the ability to do it yourself, then you must take it to someone who can do it for you. Your fellow RVers where you are currently staying will often be a good source of info regarding where to get service work done. If you do not have an owner's manual, one for the gas powered Onan 4K can be found here. Visit the Onan site if you have a different model.If you have some basic hand tools and know the difference between "rightsy tightsy" and "lefty loosy", then you just might be able to perform your own generator maintenance. Keep in mind that this article specifically covers the Onan 4K MicroQuiet generator but it can be used as a guideline for other models. Before you begin, make sure you have all the tools and parts necessary to complete the job. It took me about 30 minutes to do the maintenance but I took my time and also stopped to take pictures along the way. Here is what you'll need to have on hand:
- 1 T-30 Torx Bit
- 1 Adjustable Wrench
- 1 3/8" ratchet with a 3" extension
- 1 9/16" Socket
- 1 13/16" Spark Plug Socket
- 1 Spark Plug Gapping Tool
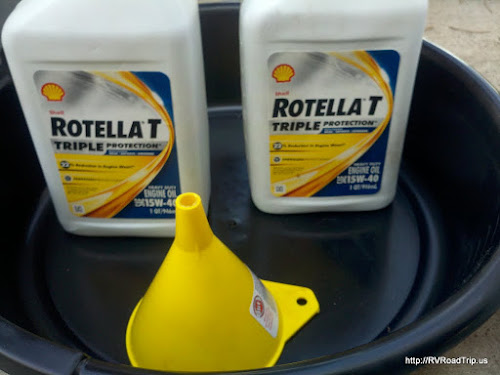
- 2 Quarts of 15W-40 Oil*
- 1 Oil Drain Pan
- 1 Funnel
- 1 Roll Shop Towels
- 1 High Temp Thread Sealant
- 1 Spark Plug, Onan Part #167-0275
- 1 Air Filter, Onan Part #140-3280
- 1 Fuel Filter, Onan Part #149-2457
*Your oil weight will vary depending on your location end temperature ranges. The owner's manual will show you what weight you will need.
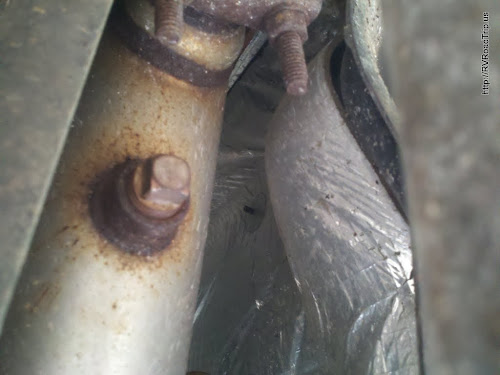
You will need to run the generator before performing the oil change. This is because heated oil will flow more freely from the drain hole. If it is time to clean your spark arrestor, go ahead and remove the 2 plugs located on the bottom of the muffler before starting the generator (see image below). You will use the adjustable wrench to do this. If yours are like mine, they will be tight and require a little muscle to get them out. Once they are out, start the generator and let it run for 5 minutes. Keep in mind the generator will be louder than usual because of the exhaust coming out of the plug holes.
After letting the generator run for 5 minutes (under load if you removed the spark arrestor plugs), let it cool enough so that you can put the spark arrestor plugs back in. Flip the 2 levers that are on the front of the generator and remove the cover panel. This is what you will see with the cover off.

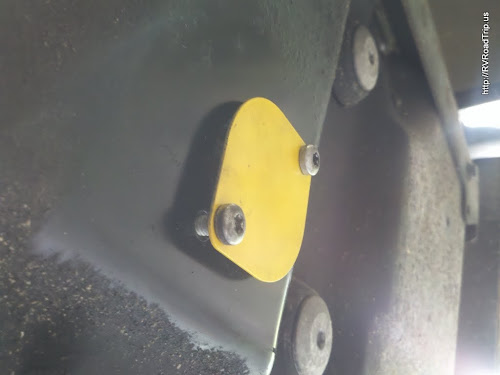
Lay down and look under your generator. You will see a small cover plate with 2 T-30 Torx screws holding it in place. The cover plate may be green or yellow... or black if covered with oily grime. Use your T-30 Torx bit and remove the cover plate, clean it up and set it aside. Once the cover is removed, you will see the oil drain plug. Place your drain pan under the plug then use the 9/16" socket, ratchet and extension to remove it. Be careful as the oil may still be hot and some WILL get on you as you remove the plug. Let the oil drain completely into the pan. Go make a glass of iced tea while you wait for the oil to drain. You can remove the oil filler cap to help speed up the draining process a little.
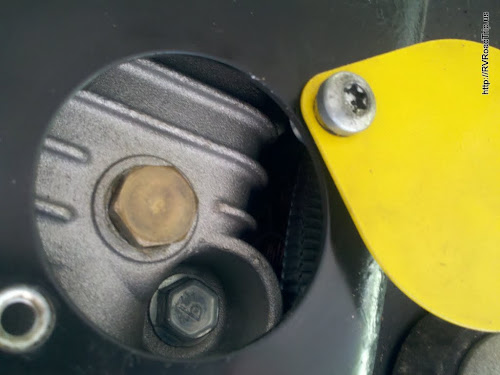
Once the oil has drained, replace the drain plug. You may need to apply thread sealant to it for a good seal so be sure to use a type that is rated to withstand the heat of the generator engine. Any auto parts store will have suitable thread sealant. Use your funnel and fill the generator with fresh oil being careful not to overfill it. The Onan 4K KY-K model has an oil capacity of 1.6 quarts. Check your owner's manual if you have a different model.
Now use your fingers and pull off the spark plug boot. It is located just to the right of the oil fill cap. Once it is off, use a deep well spark plug socket and remove the spark plug. Examine the spark plug for fouling or wear and clean/replace as necessary. Make sure the gap is set to .025 then thread the spark plug back into the hole with your fingers. This is to prevent cross threading. Once it is snug, tighten it to 13 lbs-ft. I could not get a torque wrench in there so I just snugged it up a little. Be careful not to over tighten it!

Next, remove the wing nut holding the air filter cover on. Once it is off, you will see another wing nut holding the air filter in place. Remove it and then remove the air filter. You will need to point the air filter away from you to be able to get it over the threaded shaft that holds it in. Put your new air filter in and finger tighten the wing nut that holds it in. Replace the metal cover and finger tighten that wing nut. Do not over tighten either of these wing nuts as damage to the filter can occur.
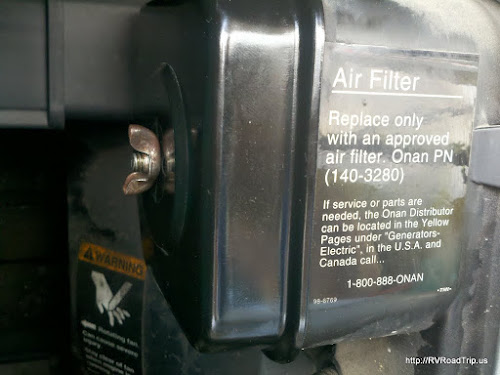

How many of you noticed the nose of our Miniature Schnauzer in the picture of the air filter box? He makes a great supervisor. :)
I did not need to change my fuel filter at this time so I do not have any pictures for that part. When it is time for me to change it, I will update this page. If you do need to change yours, check the owner's manual or a service manual. Replace the cover on your generator and start it to make sure you got everything right. Let it run a few minutes and re-check your oil level, adjust as needed. Check your oil drain plug for leaks and if none, replace the cover plate. Make a note in your RV logbook indicating the date of this service and the number of hours on the generator. Be detailed about what all you did and did not do for this particular service. Regular maintenance and properly exercising your generator will greatly extend the life of it.
Be sure to clean up any mess you made and properly dispose of the used oil.
If you do not use your generator regularly, Onan recommends that you run it each month for 2 full hours under 1/2 load. This removes moisture and keeps things lubricated.