Hilarious video of our 2014 road trip to 22 states and 15 national parks...


RV Digital Thermostat Installation / Duo-Therm and Suburban
Note: This article is if you have a Duo-Therm Roof Air and a Suburban Furnace. For Coleman Roof Air and Suburban Furnace, see the RV Thermostat Guide Part 2.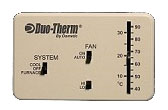 A lot of campers come with an old fashioned analog thermostat like the one pictured here. The problem with them is the temperature range before they cycle on or off. A digital thermostat has a tighter degree of control (+/- 1 degree of temperature change before it cycles "on" or "off"), a digital readout, and no guesswork about what temperature it is actually set at. Features we all like to have...
Like many others before us, we decided to swap out our analog thermostat for a nice digital one. Many digital thermostats that will run on batteries will work as a suitable replacement. We decided on a simple, inexpensive model... the Hunter model 42995. That model is obsolete, but this Honeywell model will work just as well.
First we have to remove the old thermostat. For safety reasons, make sure everything is turned off and you are not connected to shore power. Also disconnect the negative cable from your main batteries. Pop the cover off of the thermostat and remove the screws that hold it in place. You'll see a set of colored wires connected to the thermostat. Using a small screwdriver, disconnect the wires from the thermostat and make sure they do not contact each other during this entire process.
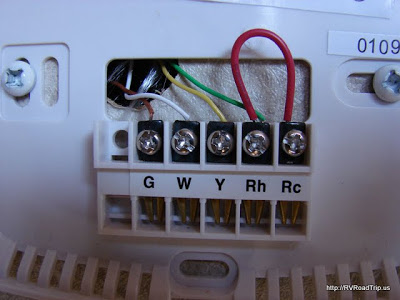
Tape off the blue and red wire, they will not be used. Next, attach the remaining wires as per the picture below. Brown wire to G, white wire to W, yellow wire to Y and green wire to Rh. Keep the jumper between Rh and Rc in place. Wiring in this manner will allow operation of the furnace and A/C with the fan on the "low" setting. Since the Hunter thermostat doesn't have a Hi/Lo fan switch, you won't be able to switch anyway and if your unit is like ours, there is virtually no difference in airflow between the settings.
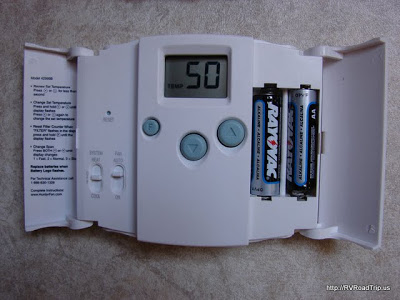
Fasten the back plate to the wall using as many screws as you feel are necessary. We used 2 but you can use up to 4. Make sure it is level before you make holes in your wall. Once you are satisfied with the mounting of the back plate and all screws are tight, pop the main thermostat unit into place. Ours went in bottom first then the top snapped in. Open the little doors on the unit and make sure the switch is set to OFF, then install 2 alkaline AA batteries as shown.
Reconnect the negative cable to your batteries and plug in to shore power again. Press and hold either the UP or DOWN arrow until the display blinks. Now tap an arrow to increase or decrease the temperature setting. Once it shows the temperature setting you want, stop pushing the buttons and after a second or two, the display will stop blinking. Set the fan to AUTO and select either HEAT or COOL.
You are now ready to go. Make sure you keep spare batteries with you at all times because if your batteries go dead, you cannot operate your furnace or air conditioner!
Note: There are multiple ways to do this upgrade, this page simply shows how we did it. Google can help you find how others did this procedure.